Zhi Shen Yong
My name is Zhi Shen Yong and I am a software developer. Here you can find a few of the projects I have worked on in the past. Please feel free to contact me for any additional information.
19 July 2019
Building a Static Website With Node.js, Express, and Pug
In this project, we will be building and serving a static website using Node.js, Express, and Pug.
The first step is to download and install Node.js. Node.js is an asynchronous, event-driven JavaScript runtime used to build scalable network applications. We will be using Node.js as the ‘server’ from which we serve our static website.
Once you have installed Node.js, open up the terminal. Verify that Node.js is installed correctly by running node -v in the terminal. If Node.js is installed correctly, you should see a version number show up on the terminal. For this project I will be using Node.js v12.4.0.
Create a new project folder and navigate to that folder by running the following commands in the terminal:
mkdir myProject
cd myProject
Here I’ve named my project folder myProject, but you can name it anything you like. Now that you’ve navigated to your project folder, create a new Node.js project by running the following command in the terminal:
npm init
The npm command-line utility should now walk you through creating a new package.json file. You may choose to edit each prompt as it appears on your screen, or choose to skip a prompt by pressing the return key. After going through all the prompts, a package.json file should be created in your project folder. The package.json file is the heart of the Node.js system, as it contains the metadata of the project.
Now we need to install Express.js.
Express.js is a light-weight web framework application to help organize your web application into an MVC architecture on the server side; it helps you manage everything – from routes to handling requests and views.ref
In your terminal, run npm install express to install Express.js in your Node.js project. If Express.js has been installed correctly, it should now appear in your package.json file, under the dependencies field.
"dependencies": {
	"express": "^4.17.1"
}
With Express.js installed, we can now start our web application for the first time. In your project folder, create a new file called server.js. In server.js, add the following code:
const express = require('express');
const app = express();

app.get('/', (req, res) => {
	res.send('Hello World!');
});

const PORT = 8080;
app.listen(PORT, () => {
	console.log(`App is listening on Port ${PORT}!`);
});
In the terminal, run node server.js. If everything is working properly, you should see a message in the terminal with the text App is listening on Port 8080! This means our server is now running, and if we navigate to localhost:8080 in our web browser, we should see the text Hello World! come up on the screen!
Let’s break down the code in server.js:
- First, we need to import the Express.js module that we installed earlier on. We do this with the
require()function on Line 1. - Afterwards, we need to initialize the Express.js module, and we do this by calling the function
express()and putting the Express.js application inside theappvariable. - The
app.listen()function at the bottom ofserver.jstells the Express.js application to listen for connections on the specified port. In this case, we have set our port to be8080. - The
app.get()function in the middle ofserver.jstells the Express.js application to listen forGETrequests at the/address, which is simplylocalhost:8080. Upon getting a request, the Express.js application sends back a response viares.send(). In this case, we are simply sending back some text,Hello World!
You can terminate the server connection by pressing control + c in the terminal. To start the server up again, simply run node server.js in the terminal.
Once we begin developing our web application, changes we make to our application will remain hidden until we restart the server. To support faster development we can install nodemon, which is a tool that automatically restarts the Node.js server when file changes in the project folder are detected. Install nodemon by running npm install --save-dev nodemon in your terminal. If nodemon has been installed correctly, it should now appear in your package.json file, under the devDependencies field.
"devDependencies": {
	"nodemon": "^1.19.1"
}
Now let’s add some code that will allow us to use the nodemon module that we installed earlier. Open up the package.json file and edit the scripts field to look like this:
"scripts": {
	"start": "nodemon server.js"
}
Now we can start our server using npm start (instead of node server.js), and nodemon should automatically restart our server whenever we edit our project.
Admittedly, there isn’t much to our web application at the moment. It would be nice to be able to display a more complex web page when we navigate to localhost:8080 instead of just having Hello World! displayed on the screen. We can do this by installing a template engine in our Node.js project. Template engines allow us to use static template files in our application. At runtime, the template engine replaces variables in a template file with actual values, and transforms the template into a HTML file sent to the client.
We will be using Pug as our template engine. To install pug, run npm install pug --save in the terminal from your project folder. You can verify that Pug has been installed correctly by checking the dependencies field in the package.json file.
With Pug installed, the first thing we need to do is to import the module in our Node.js service. To do this, add the following lines of code after const app = express():
const path = require('path');
app.set('views', path.join(__dirname, 'views'));
app.set('view engine', 'pug');
The code above tells the Express.js application to look in the views folder for template files and to use Pug as the template engine. Now we need to make some template files! If you haven’t done so already, create a views folder inside your project folder. Inside the views folder, create a new file called index.pug with the following contents:
html
head
title My Website
body
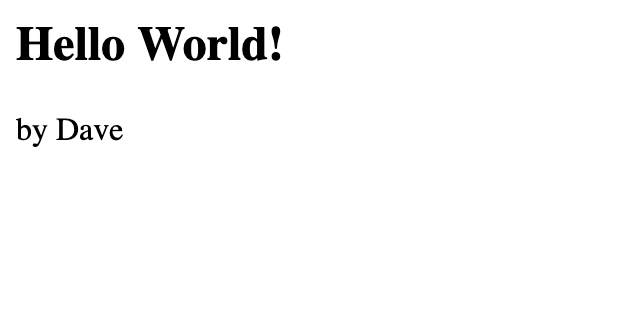
h2 Hello World!
p by Dave
Observe that the format of a Pug file is very similar to that of a regular HTML file. The difference is that there are no closing tags in Pug. With no closing tags in Pug, it is extremely important to respect whitespace when working with Pug files; a tag that is directly below and indented relative to other another tag is interpreted as being nested inside that tag. You can read more about Pug syntax here. In the example above, the p tag is nested inside the body tag but not inside the h2 tag.
To get our Node.js service to actually serve this Pug file, all we need to do is to make a small edit to our app.get() function in our server.js file so that it looks like this:
app.get('/', (req, res) => {
	res.render('index.pug');
});
Now, when a user navigates to localhost:8080, instead of sending them the String Hello World!, we now send them the rendered index.pug file. If you navigate to localhost:8080, you should see something like this:
And that’s all there is to setting up a simple static website with Node.js, Express, and Pug! The section below has more information on building more complex static websites with Pug, but if you are already comfortable with this material, feel free to check out my post on how to add client-side asynchronous dynamic functionality to our website using jQuery.
Further Reading
Armed with Node.js, Express, and Pug, we can now create any kind of static website imaginable. Anything that we can do in a regular HTML file – we can also do in Pug. Here are a few useful tips when working with Pug.
//- This is how you add comments in Pug!
//- You can add attributes to tags like this:

div(class='my-div')
	h1(style='color: blue' id='my-div-header') I am Blue!
	p(style='color: red') I am Red!
//- You can import CSS and JavaScript like this:

html
	head
		link(
			rel='stylesheet'
			href='my-styles.css'
		)
	body
		script(
			type="text/javascript"
			src="my-js.js"
		)
If you’ve created multiple web pages, you might want to serve these web pages along with index.pug. To do this, we simply need to add more app.get() functions pointing to different addresses. For instance, if we wanted to serve the file about.pug at localhost:8080/about, we would add this block of code to server.js:
app.get('/about', (req, res) => {
	res.render('about.pug');
});
Now, when a user navigates to localhost:8080/about, our Express.js application will send them the rendered about.pug file.
As an exercise, let’s try and build a grocery list website that we can serve on our home page. First, let’s start off by deleting everything off of our old index.pug file and keeping just the html, head, and body tags. We want our website to have a title, so let’s also add a title tag.
html
	head
		title My Grocery List
	body
Now, let’s add a navigation bar to our website. Instead of creating and styling our own navigation bar, we can use Bootstrap – a popular CSS framework. After having added the Bootstrap CSS file to our head, we can add the nav class in accordance with the the Bootstrap documentation.
html
    head
        title My Grocery List
        link(
            rel='stylesheet'
            href='https://stackpath.bootstrapcdn.com/bootstrap/4.3.1/css/bootstrap.min.css'
            integrity='sha384-ggOyR0iXCbMQv3Xipma34MD+dH/1fQ784/j6cY/iJTQUOhcWr7x9JvoRxT2MZw1T'
            crossorigin='anonymous'

        )
    body
        nav(class='navbar navbar-light bg-light')
            a(class='navbar-brand' href='#') My Grocery List
If you start the server and navigate to localhost:8080, you should now see a navigation bar at the top of your page with the website name My Grocery List on the left. Now, let’s add a simple list of items we would like to get next time we head to the grocery store. We can do this with Bootstrap list groups.
html
head
title My Grocery List
link(
rel='stylesheet'
href='https://stackpath.bootstrapcdn.com/bootstrap/4.3.1/css/bootstrap.min.css'
integrity='sha384-ggOyR0iXCbMQv3Xipma34MD+dH/1fQ784/j6cY/iJTQUOhcWr7x9JvoRxT2MZw1T'
crossorigin='anonymous'
)
body
nav(class='navbar navbar-light bg-light')
a(class='navbar-brand' href='#') My Grocery List
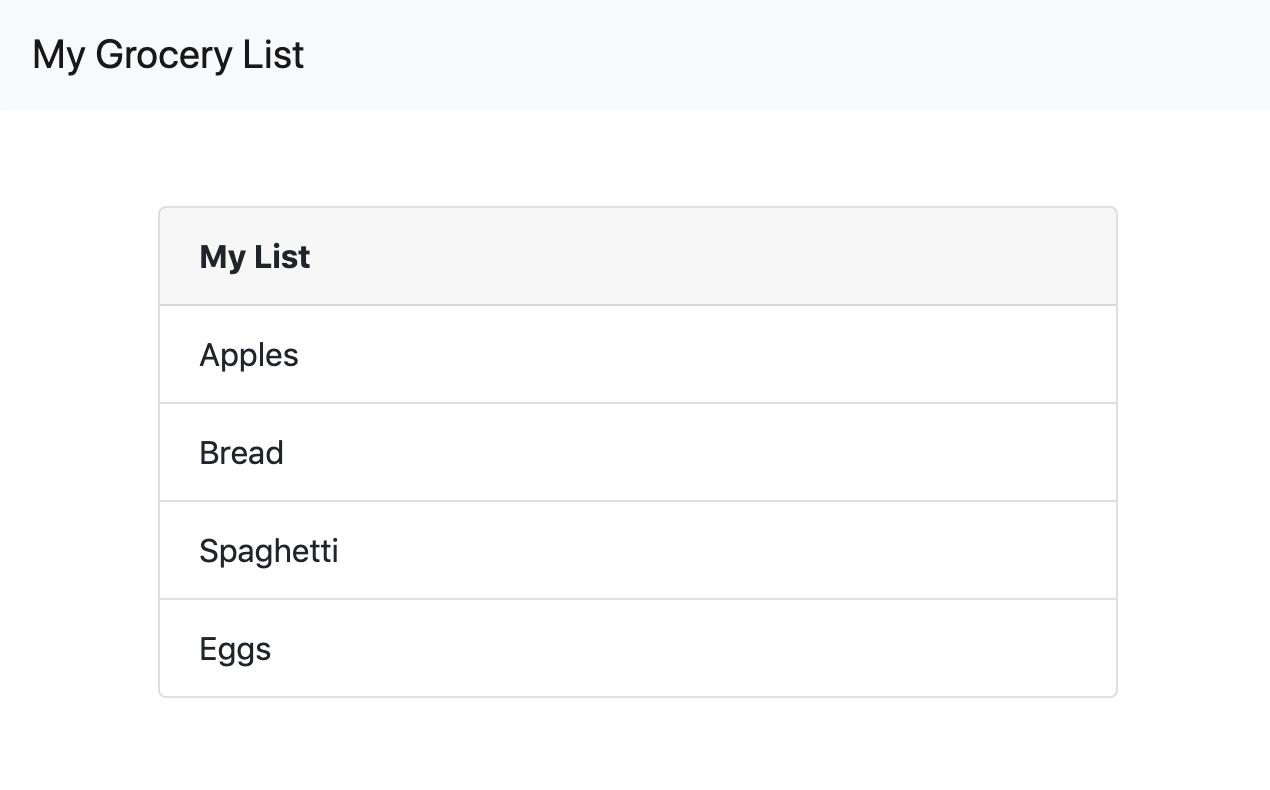
div(class='container pt-5 d-flex justify-content-center')
div(class='card' style='width: 30rem;')
div(class='card-header')
strong My List
ul(class='list-group list-group-flush')
li(class='list-group-item') Apples
li(class='list-group-item') Bread
li(class='list-group-item') Spaghetti
li(class='list-group-item') Eggs
If you refresh the page, you should now see a simple list of items in the middle of the screen that looks something like this:
Now that we know how to build and serve more complex static websites using Node.js, Express, and Pug, the next step is to add dynamic functionality to our website so that the user can interact with the website. To learn how to do this, check out my post on how to add client-side asynchronous dynamic functionality to our website using jQuery.
tags: node - express - pug